Tips for Larger Multi-Day Concrete Pour Projects
Some large projects will require more than one pour to complete. Whether you are doing an overlay or stamped concrete, matching in to the previous days work is very important. Having a project look uniform from start to finish, will lessen headaches, make happier customers and sell more work. The staff at Renew-Crete Systems™ have come up with some suggestions to help make multiple pours go a little easier.
Before you start applying your material, plan where you intend to stop. A good recommendation is to divide your job into areas about 300-500 sq ft. If possible utilize the existing natural breaks such as control/expansion joints. If the area has no control/expansion joints, you will need to create your own stopping point.
PHOTOS: Renew-Crete Systems Concrete Overlays
Stopping along expansion joints
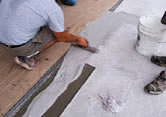
Select the control/expansion joint, use duct tape and 36″ masking paper to tape off the open side of the control/expansion joint. When you apply the material, gauge rake the stampable overlay mix over the edge of the tape and paper by 2″-3″. (Photo 1) Be sure not to thin the material along that edge. Stamp the area when ready and continue the pattern over your stopping point (lay the mats right over the tape and paper). After removing the mats, find the control/expansion joint, cut along it with a trowel and remove the tape. This should be done directly after removing the stamp tool while the material is still soft. This method will make a nice clean material break. This method also works well on deco drains, along pool copings and tiles. If this will be a finished edge, when dry, use a rub stone and lightly bevel the edge to avoid chipping of the edge.
Making stopping points
Sometimes there are no expansion joints at which to stop. In this case, you will make a stop and start point using the edge of the mats as a guide. Select an appropriate stopping point, apply your stampable overlay material about one foot past where you want to stop. When the area is ready, start stamping. Continue stamping up to about one foot before the end of your material. Leaving the last row of mats in place, use a square trowel and cut along the edge of the mat scraping the unstamped material away from the edge of the mat while it is still soft. Remove the stamps and allow to dry 4-6 hours before applying the next section.
Matching back in
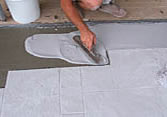
Whether you have stopped along an expansion joint, or made your own stopping point, starting a new section is very easy. Using tape and paper, mask off the dry, previously stamped material to protect it from any spillage. Now apply your bond coat with a paint brush along the edge leaving about a 1/4″ gap between the bond coat and the previously stamped area. This will prevent any excess bond coat from squeezing up to the surface or onto the previously stamped area. (Photo 2)
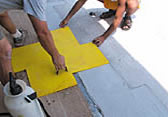
Be sure to bring the level of your overlay mix even with the previously existing stamped area. When the material is ready to stamp, remove the tape and paper revealing the previously stamped area. Carefully study the previously stamped pattern. Replace the mats over the area matching the pattern underneath (be sure to pay attention to the different stamps, red, yellow and blue). (Photo 3) Now start laying the mats locking into the old pour and continuing into the new material. If you stopped along an expansion joint, when the material is dry, re-cut the expansion joint and be sure to cut at least one inch deep and as wide as it was originally. Detail your joint work with a grinder to remove any visible seams.